Change Data Capture (CDC) captures the data of insert, update and delete activity. When you insert or delete the data in the table it maintains a record for the same data. When you update the data it maintains records for before updating the data and after updating the data.
To understand the change data capture we go through the following process.
Process

Step 1: Create DB
- CREATE DATABASE CDC_DEMO
- GO
Create one table in the preceding database.
Execute the following query and the "CDC_DEMO_TABLE1" table is created.
- USE CDC_DEMO
- GO
- CREATE TABLE CDC_DEMO_TABLE1
- (
- ID INT IDENTITY(1,1) PRIMARY KEY,
- Name VARCHAR(50) NOT NULL,
- Age INT NOT NULL,
- );
- GO

Step 3: Insert Rows
Insert some rows into the table "CDC_DEMO_TABLE1".
Here we inserted two rows into the table.
- USE CDC_DEMO
- GO
- INSERT INTO CDC_DEMO_TABLE1 (Name,Age) VALUES ('Akshay',34)
- GO
- INSERT INTO CDC_DEMO_TABLE1 (Name,Age) VALUES ('Kaushal',38)
- GO

Step 4: Enable CDC on DB
We have a database, table and some rows in the table, now we need to enable CDC on the database.
- Execute the following query and it will show whether CDC is enabled or not for the database.
- USE CDC_DEMO
- GO
- SELECT name, database_id, is_cdc_enabled
- FROM SYS.DATABASES
- WHERE name = 'CDC_DEMO'

"is_cdc_enabled" has the value "0", that means it is not enabled for the database. - Execute the following query to enable CDC on the database. We need to execute the "sys.sp_cdc_enable_db" Stored Procedure to enable CDC on the database. It is necessary to execute it before we know any tables are enabled for the CDC.This will create some system tables.
- USE CDC_DEMO
- GO
- EXEC sys.sp_cdc_enable_db
- GO
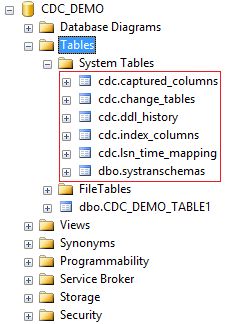
- Check again and verify that CDC is enabled on the database.
- USE CDC_DEMO
- GO
- SELECT name, database_id, is_cdc_enabled
- FROM SYS.DATABASES
- WHERE name = 'CDC_DEMO'

Now "is_cdc_enabled" has the value 1, in other words it is enabled.
Enable CDC on the "CDC_DEMO_TABLE1" table.
- Before enabling CDC, we need to check whether it is enabled already or not. Execute the following query and we have a list of all tables with CDC status.
- USE CDC_DEMO
- GO
- SELECT [name], is_tracked_by_cdc FROM SYS.TABLES
- GO
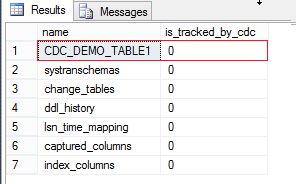
The value of "is_tracked_by_cdc" is "0" for the "CDC_DEMO_TABLE1" table, in other words CDC is not enabled for this table. - Execute the following query to enable CDC on the table.We can check in the Object Explorer that one more table is created under the system tables, "cdc.dbo_CDC_DEMO_TABLE1_CT".
- USE CDC_DEMO;
- GO
- EXECUTE sys.sp_cdc_enable_table
- @source_schema = N'dbo'
- , @source_name = N'CDC_DEMO_TABLE1'
- , @role_name = NULL
- GO
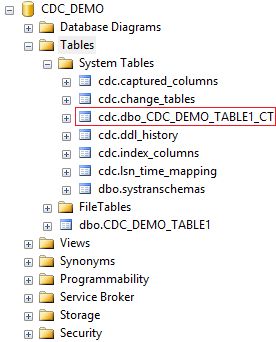
- Check again and verify that CDC is enabled on the table.
- USE CDC_DEMO
- GO
- SELECT [name], is_tracked_by_cdc FROM SYS.TABLES
- GO
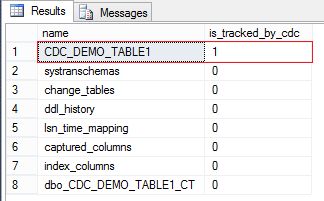
Now "is_tracked_by_cdc" has the value 1, that represents that CDC is enabled for the table.
We have enabled CDC for the database and table. Now let's check where SQL Server persists the change log when we insert the data in the table.
Execute the following query to insert one row into the table.
- USE CDC_DEMO
- GO
- INSERT INTO CDC_DEMO_TABLE1 (Name,Age) VALUES ('Jignesh',35)
- GO

The change log is captured in the table "cdc.dbo_CDC_DEMO_TABLE1_CT". You can see the entire row that we have created. One more thing you can observe here is that the _$operation value is 2, in other words for Insert values.

Step 7: Update Operation
Now let's check by updating any of the rows in the table. Execute the following script that will update the value of the name field where id = 3.
- USE CDC_DEMO
- GO
- UPDATE CDC_DEMO_TABLE1
- SET Name = 'Jigi'
- WHERE id = 3
- GO

Open the "cdc.dbo_CDC_DEMO_TABLE1_CT" table and you can see that the update data is captured in two rows. One is with operation 3 and the other with operation 4. Operation value 3 means before updating and value 4 means after updating.

Step 8: Delete Operation
To check the captured data after the delete operation, execute the following script that deletes the record with id=3.
- USE CDC_DEMO
- GO
- DELETE FROM CDC_DEMO_TABLE1
- WHERE id = 3
- GO
Open the table and verify that the record is deleted from the table.

Open the "cdc.dbo_CDC_DEMO_TABLE1_CT" table and you can see that the deleted row is captured with operation value 1.

We have seen change data capture for insert, update and delete operations and for those only one system table is used, "cdc.dbo_CDC_DEMO_TABLE1_CT". But there are more than six tables that were created when enabling CDC on the database. So let's see the schema and values for those tables:
- Cdc.captured_columns
Provides the information of columns that are tracked for the changed data capture.
- Cdc.change_tables
Provides the information of the table. It shows the default value for "capture_instance" since we have not provided a parameter when enabling CDC on the table.
- Cdc.ddl_historyProvides the information for any schema changes. Currently this table doesn't have any value since we did not change any schema for the table. So let's change the schema and check the values. Execute the following query to change the schema for the table:We have changed the datatype from varchar(50) to varchar(100) for the name field.
- USE CDC_DEMO
- GO
- ALTER TABLE CDC_DEMO_TABLE1
- ALTER COLUMN Name VARCHAR(100) NOT NULL
- GO
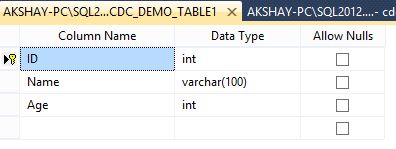
Open the "cdc.ddl_history" table and we can see that the ddl_command is captured as in the following:
- Cdc.index_columnsProvides the information if any of the index column is changed.

- Cdc.Isn_time_mappingProvides the information about the start and end time for the operation done for changes.

- Cdc.systranschemasProvides the information for the schema changes.

Execute the following query to disable CDC on the table.
- USE CDC_DEMO;
- GO
- EXECUTE sys.sp_cdc_disable_table
- @source_schema = N'dbo',
- @source_name = N'CDC_DEMO_TABLE1',
- @capture_instance = N'dbo_CDC_DEMO_TABLE1'
- GO

Step 10: Disable CDC on Database
Execute the following query to disable CDC on the database.
- USE CDC_DEMO
- GO
- EXEC sys.sp_cdc_disable_db
- GO


Comments
Post a Comment